RabbitMQ python pika
RabbitMQ 安装和用户权限设置
1
2
3
4
5
6
7
8
9
10
11
12
13
14
15
16
17
18
19
20
21
22
23
24
25
26
27
28
29
30
* RabbitMQ 安装,此步骤忽略
* 创建vhost
[wisdom@rabbitmq188 ~]$ /mnt/app/rabbitmq/sbin/rabbitmqctl add_vhost /test
Creating vhost "/test"
[wisdom@rabbitmq188 ~]$ /mnt/app/rabbitmq/sbin/rabbitmqctl list_vhosts|grep test
/test
* 对创建的vhost设置高可用
[wisdom@rabbitmq188 ~]$ /mnt/app/rabbitmq/sbin/rabbitmqctl set_policy -p /test ha-all "^" '{"ha-mode":"all"}'
Setting policy "ha-all" for pattern "^" to "{\"ha-mode\":\"all\"}" with priority "0"
[wisdom@rabbitmq188 ~]$ /mnt/app/rabbitmq/sbin/rabbitmqctl list_policies -p /test Listing policies
/test ha-all all ^ {"ha-mode":"all"} 0
* 创建用户
[wisdom@rabbitmq188 ~]$ /mnt/app/rabbitmq/sbin/rabbitmqctl add_user test test123
Creating user "test"
[wisdom@rabbitmq188 ~]$ /mnt/app/rabbitmq/sbin/rabbitmqctl list_users|grep test
test []
* 为用户设置角色
[wisdom@rabbitmq188 ~]$ /mnt/app/rabbitmq/sbin/rabbitmqctl set_user_tags test administrator monitoring
Setting tags for user "test" to [administrator,monitoring]
[wisdom@rabbitmq188 ~]$ /mnt/app/rabbitmq/sbin/rabbitmqctl list_users|grep test test [administrator, monitoring]
* 为用户设置权限
[wisdom@rabbitmq188 ~]$ /mnt/app/rabbitmq/sbin/rabbitmqctl set_permissions -p /test test '.*' '.*' '.*'
Setting permissions for user "test" in vhost "/test"
[wisdom@rabbitmq188 ~]$ /mnt/app/rabbitmq/sbin/rabbitmqctl list_permissions -p /test Listing permissions in vhost "/test"
test .* .* .*-
1
[root@rabbitmq188 ~]# pip install pika
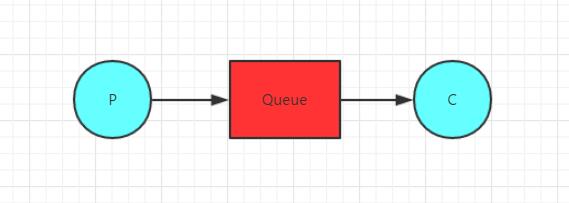
RabbitMQ 单向发送消息

1
2
3
4
5
6
7
8
9
10
11
12
13
14
15
16
17
18
19
20
21
22
23
24
25
26
27
28
29
30
31
32
33
34
35
36
37
38
39
40
41
42
43
44
45
46
47
48
49
50
51
52
53
54
55
56
57
58
59
60
61
62
63
64
65
66
67
68
69
70
71
72
73
74
75
76
77
78
79
80
81
82
83
84
85
86
87
88
89
90
91
92
93
94
//生产者
[wisdom@rabbitmq188 web]$ /mnt/app/rabbitmq/sbin/rabbitmqctl list_queues -p /test
Listing queues
[wisdom@rabbitmq188 web]$ cat > msg_send.py <<EOF
#!/usr/bin/env python
#-*- coding:utf-8 -*-
import sys
import pika
# 建立与RabbitMQ建立连接
credentials = pika.PlainCredentials("test","test123")
conn_params = pika.ConnectionParameters("192.168.13.188",
5672,
"/test",
credentials = credentials)
conn_broker = pika.BlockingConnection(conn_params)
# 创建信道(生产者和消费者与RabbitMQ建立一条通道)
channel = conn_broker.channel()
# 创建队列(消息发送到队列)
channel.queue_declare(queue='queue_hello')
# 发布消息
channel.basic_publish(exchange="",
routing_key="queue_hello",
body='Hello World!')
print("msg_send 'Hello World!'")
# 关闭与RabbitMQ建立连接
conn_broker.close()
EOF
[wisdom@rabbitmq188 web]$ python msg_send.py
msg_send 'Hello World!'
[wisdom@rabbitmq188 web]$ /mnt/app/rabbitmq/sbin/rabbitmqctl list_queues -p /test |grep hello
queue_hello 1
[wisdom@rabbitmq188 web]$ /mnt/app/rabbitmq/sbin/rabbitmqctl list_exchanges -p /test |grep hello
exchange_hello direct
//消费者
[wisdom@rabbitmq188 web]$ cat > msg_receive.py <<EOF
#!/usr/bin/env python
#-*- coding:utf-8 -*-
import sys
import pika
# 建立与RabbitMQ建立连接
credentials = pika.PlainCredentials("test","test123")
conn_params = pika.ConnectionParameters("192.168.13.188",
5672,
"/test",
credentials = credentials)
conn_broker = pika.BlockingConnection(conn_params)
# 创建信道(生产者和消费者与RabbitMQ建立一条通道)
channel = conn_broker.channel()
# 创建队列(消息发送到队列)
channel.queue_declare(queue='queue_hello')
# 创建消费消息
def callback(ch, method, properties, body):
print("[x] Received %r" % body)
# 订阅消息
channel.basic_consume(callback,
queue='queue_hello',
no_ack=True)
print('[*] Waiting for messages. To exit press CTRL+C')
# 开始消费
channel.start_consuming()
EOF
[wisdom@rabbitmq188 web]$ python msg_receive.py
[*] Waiting for messages. To exit press CTRL+C
//执行msg_send.py 脚本,然后观察 msg_receive.py
[wisdom@rabbitmq188 web]$ python msg_receive.py
[*] Waiting for messages. To exit press CTRL+C
[x] Received 'Hello World!'
[x] Received 'Hello World!'RabbitMQ 工作队列
1
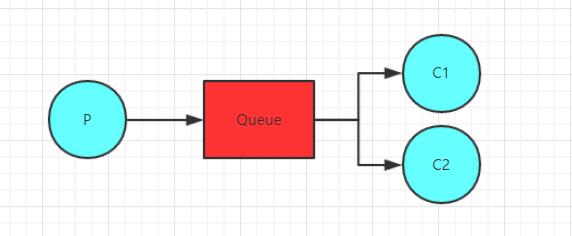
消息也可以理解为任务,消息发送者可以理解为任务分配者,消息接收者可以理解为工作者,当工作者接收到一个任务,还没完成的时候,任务分配者又发一个任务过来,那就忙不过来了,于是就需要多个工作者来共同处理这些任务,这些工作者,就称为工作队列

1
2
3
4
5
6
7
8
9
10
11
12
13
14
15
16
17
18
19
20
21
22
23
24
25
26
27
28
29
30
31
32
33
34
35
36
37
38
39
40
41
42
43
44
45
46
47
48
49
50
51
52
53
54
55
56
57
58
59
60
61
62
63
64
65
66
67
68
69
70
71
72
73
74
75
76
77
78
79
80
81
82
83
84
85
86
87
88
89
90
91
92
93
94
95
96
97
98
99
100
101
102
103
104
105
106
107
108
109
110
111
112
113
114
115
116
117
//生产者
[wisdom@rabbitmq188 web]$ cat > msg_send.py <<EOF
#!/usr/bin/env python
#-*- coding:utf-8 -*-
import sys
import pika
message = ' '.join(sys.argv[1:]) or "Hello World!"
# 建立与RabbitMQ建立连接
credentials = pika.PlainCredentials("test","test123")
conn_params = pika.ConnectionParameters("192.168.13.188",
5672,
"/test",
credentials = credentials)
conn_broker = pika.BlockingConnection(conn_params)
# 创建信道(生产者和消费者与RabbitMQ建立一条通道)
channel = conn_broker.channel()
# 创建队列(消息发送到队列)
channel.queue_declare(queue='queue_hello')
# 发布消息
channel.basic_publish(exchange="",
routing_key="queue_hello",
body=message)
print("[x] Sent %r" % (message,))
# 关闭与RabbitMQ建立连接
conn_broker.close()
EOF
//消费者(worker_1.py和worker_2 内容一致)
[wisdom@rabbitmq188 web]$ cat > worker_1.py <<EOF
#!/usr/bin/env python
#-*- coding:utf-8 -*-
import sys
import pika
import time
# 建立与RabbitMQ建立连接
credentials = pika.PlainCredentials("test","test123")
conn_params = pika.ConnectionParameters("192.168.13.188",
5672,
"/test",
credentials = credentials)
conn_broker = pika.BlockingConnection(conn_params)
# 创建信道(生产者和消费者与RabbitMQ建立一条通道)
channel = conn_broker.channel()
# 创建队列(消息发送到队列)
channel.queue_declare(queue='queue_hello')
# 创建消费消息
def callback(ch, method, properties, body):
print("[x] Received %r" % (body,))
time.sleep(body.count('.'))
print("[x] Done")
# 订阅消息
channel.basic_consume(callback,
queue='queue_hello',
no_ack=True)
print('[*] Waiting for messages. To exit press CTRL+C')
# 开始消费
channel.start_consuming()
EOF
//启动worker_1.py和worker_2.py
[wisdom@rabbitmq188 web]$ python worker_1.py
[*] Waiting for messages. To exit press CTRL+C
[wisdom@rabbitmq188 web]$ python worker_2.py
[*] Waiting for messages. To exit press CTRL+C
//执行 msg_send.py向队列写入数据
[wisdom@rabbitmq188 web]$ python msg_send.py First message.
[x] Sent 'First message.'
[wisdom@rabbitmq188 web]$ python msg_send.py Second message.
[x] Sent 'Second message.'
[wisdom@rabbitmq188 web]$ python msg_send.py Third message.
[x] Sent 'Third message.'
[wisdom@rabbitmq188 web]$ python msg_send.py Fourth message.
[x] Sent 'Fourth message.'
[wisdom@rabbitmq188 web]$ python msg_send.py Fifth message.
[x] Sent 'Fifth message.'
//worker_1.py返回状态
[wisdom@rabbitmq188 web]$ python worker_1.py
[*] Waiting for messages. To exit press CTRL+C
[x] Received 'Second message.'
[x] Done
[x] Received 'Fourth message.'
[x] Done
//worker_2.py返回状态
[wisdom@rabbitmq188 web]$ python worker_2.py
[*] Waiting for messages. To exit press CTRL+C
[x] Received 'First message.'
[x] Done
[x] Received 'Third message.'
[x] Done
[x] Received 'Fifth message.'
[x] Done
综上,每个工作者,都会依次分配到任务.如果一个工作者,在处理任务的时候挂掉,这个任务就没有完成,应当交由其他工作者处理.所以应当有一种机制,当一个工作者完成任务时,会反馈消息.
1 | 消息确认就是当工作者完成任务后,会反馈给rabbitmq.修改worker.py中的回调函数: |
1 | 虽然有了消息反馈机制,正在执行的任务不会丢失,但是如果rabbitmq本身服务挂掉的话,那么任务还是会丢失.所以需要将任务持久化存储起来.声明持久化存储: |
1 | 公平调度: |
- RabbitMQ 交换器
1
2
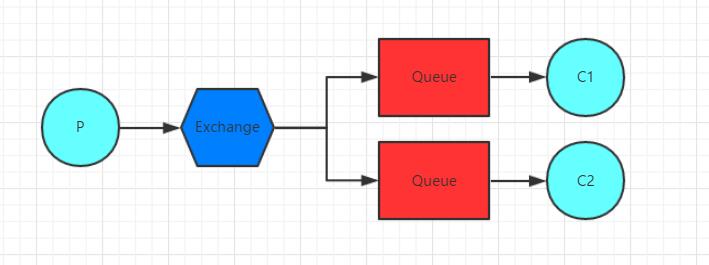
3工作队列,每次消息都只会发送给其中一个接收端,如果需要将消息广播出去,让每个接收端都能收到,那么就要使用交换机
交换机的工作原理: 消息发送端先将消息发送给交换机,交换机再将消息发送到绑定的消息队列,而后每个接收端都能从各自的消息队列里接收到信息

1
2
3
4
5
6
7
8
9
10
11
12
13
14
15
16
17
18
19
20
21
22
23
24
25
26
27
28
29
30
31
32
33
34
35
36
37
38
39
40
41
42
43
44
45
46
47
48
49
50
51
52
53
54
55
56
57
58
59
60
61
62
63
64
65
66
67
68
69
70
71
72
73
74
75
76
77
78
79
80
81
82
83
84
85
86
87
88//生产者
[wisdom@rabbitmq188 web]$ cat > msg_send.py <<EOF
#!/usr/bin/env python
#-*- coding:utf-8 -*-
import sys
import pika
message = ' '.join(sys.argv[1:]) or "Hello World!"
# 建立与RabbitMQ建立连接
credentials = pika.PlainCredentials("test","test123")
conn_params = pika.ConnectionParameters("192.168.13.188",
5672,
"/test",
credentials = credentials)
conn_broker = pika.BlockingConnection(conn_params)
# 创建信道(生产者和消费者与RabbitMQ建立一条通道)
channel = conn_broker.channel()
# 创建交换机
channel.exchange_declare(exchange="exchange_hello",type='fanout') #创建交换机
# 发布消息
channel.basic_publish(exchange="exchange_hello", #发布消息到交换机
routing_key="",
body='Hello World!')
print("[x] Sent 'Hello World!'")
# 关闭与RabbitMQ建立连接
conn_broker.close()
EOF
注意:
1.生产者要将消息发送到交换机,而不是队列.
2.basic_publish方法的参数exchange被设定为相应交换机,因为是要广播出去,发送到所有队列,所以routing_key就不需要设定了
3.exchange如果为空,表示是使用匿名的交换机(例如:amq.*这样的交换机,就是系统默认的交换机).routing_key在使用匿名交换机的时候才需要指定,表示发送到哪个队列的意思
//消费者
[wisdom@rabbitmq188 web]$ cat > msg_receive.py <<EOF
#!/usr/bin/env python
#-*- coding:utf-8 -*-
import sys
import pika
import time
# 建立与RabbitMQ建立连接
credentials = pika.PlainCredentials("test","test123")
conn_params = pika.ConnectionParameters("192.168.13.188",
5672,
"/test",
credentials = credentials)
conn_broker = pika.BlockingConnection(conn_params)
# 创建信道(生产者和消费者与RabbitMQ建立一条通道)
channel = conn_broker.channel()
# 创建交换机
channel.exchange_declare(exchange='exchange_hello', type='fanout') # 创建交换机
# 创建随机队列,并绑定到交换机上
# "exclusive=True"表示当接收端退出时,销毁临时产生的队列
queue_random = channel.queue_declare(exclusive=True) # 创建随机队列,并绑定到交换机.
queue_name = queue_random.method.queue
channel.queue_bind(exchange='exchange_hello',queue=queue_name)
# 创建消费消息
def callback(ch, method, properties, body):
print("[x] Received %r" % (body,))
# 订阅消息
channel.basic_consume(callback,
queue=queue_name,
no_ack=True)
print('[*] Waiting for messages. To exit press CTRL+C')
# 开始消费
channel.start_consuming()
EOF
RabbitMQ 路由键
1
2
3交换机已经能实现给所有接收端发送消息,但是如果需要自由定制,有的消息发给其中一些接收端,有些消息发送给另外一些接收端,这种情况就需要用到路由键了
路由键的工作原理: 每个接收端的消息队列在绑定交换机的时候,可以设定相应的路由键.发送端通过交换机发送信息时,可以指明路由键,交换机会根据路由键把消息发送到相应的消息队列,这样接收端就能接收到消息了1
2
3
4
5
6
7
8
9
10
11
12
13
14
15
16
17
18
19
20
21
22
23
24
25
26
27
28
29
30
31
32
33
34
35
36
37
38
39
40
41
42
43
44
45
46
47
48
49
50
51
52
53
54
55
56
57
58
59
60
61
62
63
64
65
66
67
68
69
70
71
72
73
74
75
76
77
78
79
80
81
82
83
84
85
86
87
88
89
90
91
92
93
94
95//生产者
[wisdom@rabbitmq188 web]$ cat > msg_send.py <<EOF
#!/usr/bin/env python
#-*- coding:utf-8 -*-
import sys
import pika
# 建立与RabbitMQ建立连接
credentials = pika.PlainCredentials("test","test123")
conn_params = pika.ConnectionParameters("192.168.13.188",
5672,
"/test",
credentials = credentials)
conn_broker = pika.BlockingConnection(conn_params)
# 创建信道(生产者和消费者与RabbitMQ建立一条通道)
channel = conn_broker.channel()
# 创建交换机
channel.exchange_declare(exchange="exchange_hello",type='direct')
# 定义三个路由键
routings = ['info','warning','error']
# 将消息发布到交换机,并设置路由键
for routing in routings:
message = '%s message.' % routing
channel.basic_publish(exchange="exchange_hello",
routing_key=routing,
body=message)
print(message)
# 关闭与RabbitMQ建立连接
conn_broker.close()
EOF
//消费者
[wisdom@rabbitmq188 web]$ cat > msg_receive.py <<EOF
#!/usr/bin/env python
#-*- coding:utf-8 -*-
import sys
import pika
import time
# 建立与RabbitMQ建立连接
credentials = pika.PlainCredentials("test","test123")
conn_params = pika.ConnectionParameters("192.168.13.188",
5672,
"/test",
credentials = credentials)
conn_broker = pika.BlockingConnection(conn_params)
# 创建信道(生产者和消费者与RabbitMQ建立一条通道)
channel = conn_broker.channel()
# 创建交换机
channel.exchange_declare(exchange='exchange_hello', type='direct')
# 从命令行获取路由键参数,如果没有,默认为info
routings = sys.argv[1:]
if not routings:
routings = ['info']
# 创建随机队列,并绑定到交换机上,设置路由键
queue_random = channel.queue_declare(exclusive=True)
queue_name = queue_random.method.queue
for routing in routings:
channel.queue_bind(exchange='exchange_hello',
queue=queue_name,
routing_key=routing)
# 创建消费消息
def callback(ch, method, properties, body):
print("[x] Received %r" % (body,))
# 订阅消息
channel.basic_consume(callback,
queue=queue_name,
no_ack=True)
print('[*] Waiting for messages. To exit press CTRL+C')
# 开始消费
channel.start_consuming()
EOF
//执行msg_receive.py
[wisdom@rabbitmq188 web]$ python msg_receive.py warning error
[*] Waiting for messages. To exit press CTRL+CRabbitMQ 路由键模糊匹配
1
2通过设置路由键,可以将消息发送到相应的队列,这里的路由键是要完全匹配,比如: info消息的只能发到路由键为info的消息队列
路由键模糊匹配,就是可以使用正则表达式.和常用的正则表示式不同,这里的话"#"表示所有,全部的意思;"*"只匹配到一个词
1 | //生产者 |
RabbitMQ 远程结果返回
1
2
3前面的例子都有个共同点,就是发送端发送消息出去后没有结果返回.如果只是单纯发送消息,当然没有问题了.但是在实际中,常常会需要接收端将收到的消息进行处理之后,返回给发送端.
处理方法描述: 发送端在发送信息前,产生一个接收消息的临时队列,该队列用来接收返回的结果.其实在这里接收端,发送端的概念已经比较模糊了,因为发送端也同样要接收消息,接收端同样也要发送消息1
2
3
4
5
6
7
8
9
10
11
12
13
14
15
16
17
18
19
20
21
22
23
24
25
26
27
28
29
30
31
32
33
34
35
36
37
38
39
40
41
42
43
44
45
46
47
48
49
50
51
52
53
54
55
56
57
58
59
60
61
62
63
64
65
66
67
68
69
70
71
72
73
74
75
76
77
78
79
80
81
82
83
84
85
86
87
88
89
90
91
92
93
94
95
96
97
98
99
100
101
102示例内容: 假设有一个控制中心和一个计算节点,控制中心会将一个自然数N发送给计算节点,计算节点将N值加1后,返回给控制中心.这里用center.py模拟控制中心,compute.py模拟计算节点
//生产者
[wisdom@rabbitmq188 web]$ cat > msg_send.py <<EOF
#!/usr/bin/env python
#-*- coding:utf-8 -*-
import sys
import pika
class Center(object):
def __init__(self):
# 建立与RabbitMQ建立连接
self.credentials = pika.PlainCredentials("test","test123")
self.conn_params = pika.ConnectionParameters("192.168.13.188",
5672,
"/test",
credentials = self.credentials)
self.conn_broker = pika.BlockingConnection(self.conn_params)
# 创建信道(生产者和消费者与RabbitMQ建立一条通道)
self.channel = self.conn_broker.channel()
# 定义接收到返回消息处理方法
def on_response(self,ch,method,props,body):
self.response = body
def request(self,n):
self.response = None
#发送计算请求,并声明返回队列
self.channel.basic_publish(exchange='',
routing_key='queue_compute',
properties=pika.BasicProperties(
reply_to = self.callback_queue,
),
body=str(n))
#接收返回的数据
while self.response is None:
self.conn_broker.process_data_events()
return int(self.response)
center = Center()
print " [x] Requesting increase(30)"
response = center.request(30)
print " [.] Got %r" % (response,)
EOF
//消费者
[wisdom@rabbitmq188 web]$ cat > msg_receive.py <<EOF
#!/usr/bin/env python
#-*- coding:utf-8 -*-
import sys
import pika
import time
# 建立与RabbitMQ建立连接
credentials = pika.PlainCredentials("test","test123")
conn_params = pika.ConnectionParameters("192.168.13.188",
5672,
"/test",
credentials = credentials)
conn_broker = pika.BlockingConnection(conn_params)
# 创建信道(生产者和消费者与RabbitMQ建立一条通道)
channel = conn_broker.channel()
# 创建队列
channel.queue_declare(queue='queue_compute')
print('[*] Waiting for n')
# 将n值加1
def increase(n):
return n + 1
# 创建消费消息
def callback(ch, method, properties, body):
print("[.] increase(%s)" % (body,))
response = increase(int(body))
# 将计算结果返回生产者
ch.basic_publish(exchange='',
routing_key=properties.reply_to,
body=str(response))
ch.basic_ack(delivery_tag=method.delivery_tag)
channel.basic_qos(prefetch_count=1)
# 订阅消息
channel.basic_consume(callback,
queue='queue_compute',
no_ack=False)
print('[*] Waiting for messages. To exit press CTRL+C')
# 开始消费
channel.start_consuming()
EOFRabbitMQ 相互关联编号”correlation id”
1
2
3
4
5远程结果中有一个没有提到,就是"correlation id",这是什么呢?
假设有多个计算节点,控制中心开启多个线程,往这些计算节点发送数字,要求计算结果并返回,但是控制中心只开启了一个队列,所有线程都是从这个队列里获取消息,每个线程如何确定收到的消息就是该线程对应的呢?这个就是"correlation id"的用处了.correlation翻译成中文就是相互关联,也表达了这个意思
"correlation id"运行原理: 控制中心发送计算请求时设置"correlation id",而后计算节点将计算结果,连同接收到的"correlation id"一起返回,这样控制中心就能通过"correlation id"来标识请求.其实"correlation id"也可以理解为请求的唯一标识码1
2
3
4
5
6
7
8
9
10
11
12
13
14
15
16
17
18
19
20
21
22
23
24
25
26
27
28
29
30
31
32
33
34
35
36
37
38
39
40
41
42
43
44
45
46
47
48
49
50
51
52
53
54
55
56
57
58
59
60
61
62
63
64
65
66
67
68
69
70
71
72
73
74
75
76
77
78
79
80
81
82
83
84
85
86
87
88
89
90
91
92
93
94
95
96
97
98
99
100
101
102
103
104
105
106
107
108
109
110
111
112
113
114
115
116
117
118
119
120
121
122
123
124
125
126
127
128
129
130
131
132示例内容: 控制中心开启多个线程,每个线程都发起一次计算请求,通过"correlation id",每个线程都能准确收到相应的计算结果
//生产者
[wisdom@rabbitmq188 web]$ cat > msg_send.py <<EOF
#!/usr/bin/env python
#-*- coding:utf-8 -*-
import sys
import pika
import threading
import uuid
# 自定义线程类,继承threading.Thread
class MyThread(threading.Thread):
def __init__(self):
super(MyThread,self).__init()
self.func = func
self.num = num
def run(self):
print("[x] Requesting increase(%d)" % self.num)
response = self.func(self.num)
print "[.] increase(%d)=%d" % (self.num, response)
# 控制中心类
class Center(object):
def __init__(self):
# 建立与RabbitMQ建立连接
self.credentials = pika.PlainCredentials("test","test123")
self.conn_params = pika.ConnectionParameters("192.168.13.188",
5672,
"/test",
credentials = self.credentials)
self.conn_broker = pika.BlockingConnection(self.conn_params)
# 创建信道(生产者和消费者与RabbitMQ建立一条通道)
self.channel = self.conn_broker.channel()
# 定义接收返回消息队列
result = self.channel.queue_declare(exclusive=True)
self.callback_queue = result.method.queue
self.channel.basic_consume(self.on_response,
no_ack=True,
queue=self.callback_queue)
#返回的结果都会存储在该字典里
self.response = {}
# 定义接收到返回消息处理方法
def on_response(self,ch,method,props,body):
self.response[props.correlation_id] = body
def request(self,n):
corr_id = str(uuid.uuid4())
self.response[corr_id] = None
#发送计算请求,并声明返回队列
self.channel.basic_publish(exchange='',
routing_key='queue_compute',
properties=pika.BasicProperties(
reply_to = self.callback_queue,
correlation_id = corr_id,
),
body=str(n))
#接收返回的数据
while self.response is None:
self.conn_broker.process_data_events()
return int(self.response[corr_id])
center = Center()
#发起5次计算请求
nums= [10, 20, 30, 40 ,50]
threads = []
for num in nums:
threads.append(MyThread(center.request, num))
for thread in threads:
thread.start()
for thread in threads:
thread.join()
EOF
//消费者
[wisdom@rabbitmq188 web]$ cat > msg_receive.py <<EOF
#!/usr/bin/env python
#-*- coding:utf-8 -*-
import sys
import pika
import time
# 建立与RabbitMQ建立连接
credentials = pika.PlainCredentials("test","test123")
conn_params = pika.ConnectionParameters("192.168.13.188",
5672,
"/test",
credentials = credentials)
conn_broker = pika.BlockingConnection(conn_params)
# 创建信道(生产者和消费者与RabbitMQ建立一条通道)
channel = conn_broker.channel()
# 创建队列
channel.queue_declare(queue='queue_compute')
print('[*] Waiting for n')
# 将n值加1
def increase(n):
return n + 1
# 创建消费消息
def callback(ch, method, properties, body):
print("[.] increase(%s)" % (body,))
response = increase(int(body))
# 将计算结果返回生产者,增加"correlation_id"的设定
ch.basic_publish(exchange='',
routing_key=properties.reply_to,
properties=pika.BasicProperties(correlation_id= \
props.correlation_id),
body=str(response))
ch.basic_ack(delivery_tag=method.delivery_tag)
channel.basic_qos(prefetch_count=1)
# 订阅消息
channel.basic_consume(callback,
queue='queue_compute',
no_ack=False)
print('[*] Waiting for messages. To exit press CTRL+C')
# 开始消费
channel.start_consuming()
EOF